
Showing posts with label DIY. Show all posts
Showing posts with label DIY. Show all posts
Friday, January 1, 2016
Wednesday, June 17, 2015
Today's Outgoing: June 17, 2015
 |
| New batch of missionary mail. |
 |
| Totally diggin' that jelly bean encrusted cake. I made these top two envelopes from magazine ads. I'm hoping they aren't too fragile for international travel. |
 |
| Pusheen is always birthday appropriate. |
Tuesday, June 9, 2015
Today's Outgoing: June 9, 2015

I completed a new batch of desecrated/evolved children's book envelopes! Cathleen gets to be the first recipient of the Cinderella edition. :)
Wednesday, May 27, 2015

Tuesday, May 12, 2015
Today's Outgoing: May 12,2015

Wednesday, May 6, 2015
Today's Outgoing: May 6, 2015

Today's batch of missionary mail. Also, got new address labels! Check out my cute little foxes. :)

Plus, made these simple, cute cards on my Cameo. Free Dingbats + Silhouette Sketch Pens = easy awesomeness. Seriously easy.
Thursday, April 30, 2015
DIY Butterfly Birthday card

Inspired by this pin, I made this with my Cameo, but wouldn't be a difficult one to do the old fashioned way provided you have the right punches. The sentiment isn't real clear in the picture, but it reads "Hope this year is your best one yet". Super easy and highly adorable.
Friday, April 17, 2015
Kyoto Kuties Birthday Card

If you are the kind of person who roams the internet in search of free files to pair with your Cricut or Cameo but haven't yet come across the Kyoto Kuties, you have been missing out, my friend! The free SVG file actually comes in several formats other than just what was compatible with my Cameo, and includes a readme to inform you which format works best with your machine.
 The designs included with the Kyoto Kuties pack are obviously very cute, and excellent quality. Lots of layers make each image detailed and nicely dimensional. The card base is my own design that was pretty easily assembled out of the design tools and freebie shapes that were included with my Cameo. I really liked the peekaboo design for looks, but discovered I hadn't planned well to leave space for writing. I suppose this is a great option for those people that you care enough about (or are obligated enough ;) ) to send a card to, but are just a little bit lost for words.
Overall however, I am quite pleased with the way this one turned out.
Tuesday, April 14, 2015
Easy DIY Watercolor Envelopes

As the subject line states, this is a really easy project. The painting process probably takes less than one minute per person, and just a couple minutes to dry. (Definitely a good option if you find you are behind on letters, but still want to have a nice touch to the letters you send.)
Headed out to Cathleen in Washington!
Friday, April 3, 2015

Tuesday, March 24, 2015
Stamp licking pup
Here's my latest piece of mail art. I learned recently that having your stamps adhered to the upper corner at perfectly right angles is a rule that can be broken! The trick is just to take it into the post office and kindly ask your friendly mail worker to hand cancel the envelope.
However, my local post office always has an hour long line, and the agitated tones and scowling expressions on the faces of those workers scared me away enough that I wimped out and retreated. (Apparently the friendly mail workers were off that day.) I deposited the envelope into a drop box instead, so we'll see if it ever arrives. :-/
EDIT 04/04/2015: Turns out it arrived just fine! :)
EDIT 04/04/2015: Turns out it arrived just fine! :)

Wednesday, March 4, 2015
Today's Outgoing: March 5, 2015
This cute little lion on a spring is going out to my cousin Kristie who enters the Missionary Training Center today to prepare to serve as a missionary in Finland for the next 18 months. Congratulations, Kristie!

DIY Birthday Cards

I don't know about you, but I've recently discovered March is a very busy month for birthdays! Therefore, I spent my weekend trying to crank out a few birthday cards. The one with the flaming cake is by far my favorite design (which I stole from here via Pinterest). I've kept that one up my sleeve for years waiting for my dad's big 60th birthday which happens to be next week. (I'll warn you that all those flames are painstaking to assemble, but so, so worth it.)


Though I did arrange this one myself, the cake used on this green model comes from the Silhouette store. However, you can download my new favorite font for free (Oooh, alliteration!) right here. This is an especially good font for die cutting machines because it looks naturally connected which means fewer pieces to glue down. For instance, Happy Birthday is in all of 6 pieces instead of 14 as it would be with other fonts.

Wednesday, February 25, 2015
DIY Envelopes From Used Children's Books

Lucky for me, almost all of the children's books at Goodwill are just 99 cents. I was surprised that most of them were in like new condition! Plus, the paper had a nice weight and gloss to it unlike the big stacks of printed scrapbook paper I usually use. Like I said earlier, it's important to get books as large as you can find so that there is enough material to make a good sized envelope. With this Disney Princess book (about 11x14) I was able to make envelopes large enough to hold a 5x7 card.

The template I used was more or less like this one. I wanted to have large rectangular flaps to include as much of the image as possible on the reverse side of the envelope.Looking at the template, you can tell you'll want to find images that have the focal point slightly above or below the center of the page if you want it to line up with the front panel of the envelope. Since I am lucky enough to have a Cameo, cranking out all of these envelopes took no time at all. However, even before my Cameo days, I discovered the time goes right by if you cut them out while watching an episode or two of LOST. ;)

Tuesday, February 10, 2015
DIY Happy Giraffe Card
 |
| I gotta start using a better camera. |
I whipped up this cute card a few weeks ago just to use up my last giraffe sticker, but not gonna lie,- I'm pretty impressed with the results!
Today out of the blue I felt like I should drop something in the mail again for my cousin serving a mission in Mexico. I never heard if his birthday card survived the iffy Mexican postal service, but I decided to try again anyway. Maybe it's just a meaningless whim, and maybe it will never get to him, but a little happy mail never hurt anybody.
I'm told that his family has had luck with the pouch system (AKA the ugly mail system. Seriously, you can't even use envelopes!), but I'm not going to give up on regular mail just yet.
Thursday, January 15, 2015
DIY Pen Pal Kit

The DIY Pen Pal kit isn't a new idea. (I was originally inspired by this post over at Making Mondays.) In any case, this is a very easy, inexpensive project that I would highly recommend for both children and adults. This is the third time I've put together a kit for someone, but I am always surprised at how different each kit looks from one to the next. The contents are basically the same (paper, envelopes, pens, stickers) but there's a ton of room for customization.
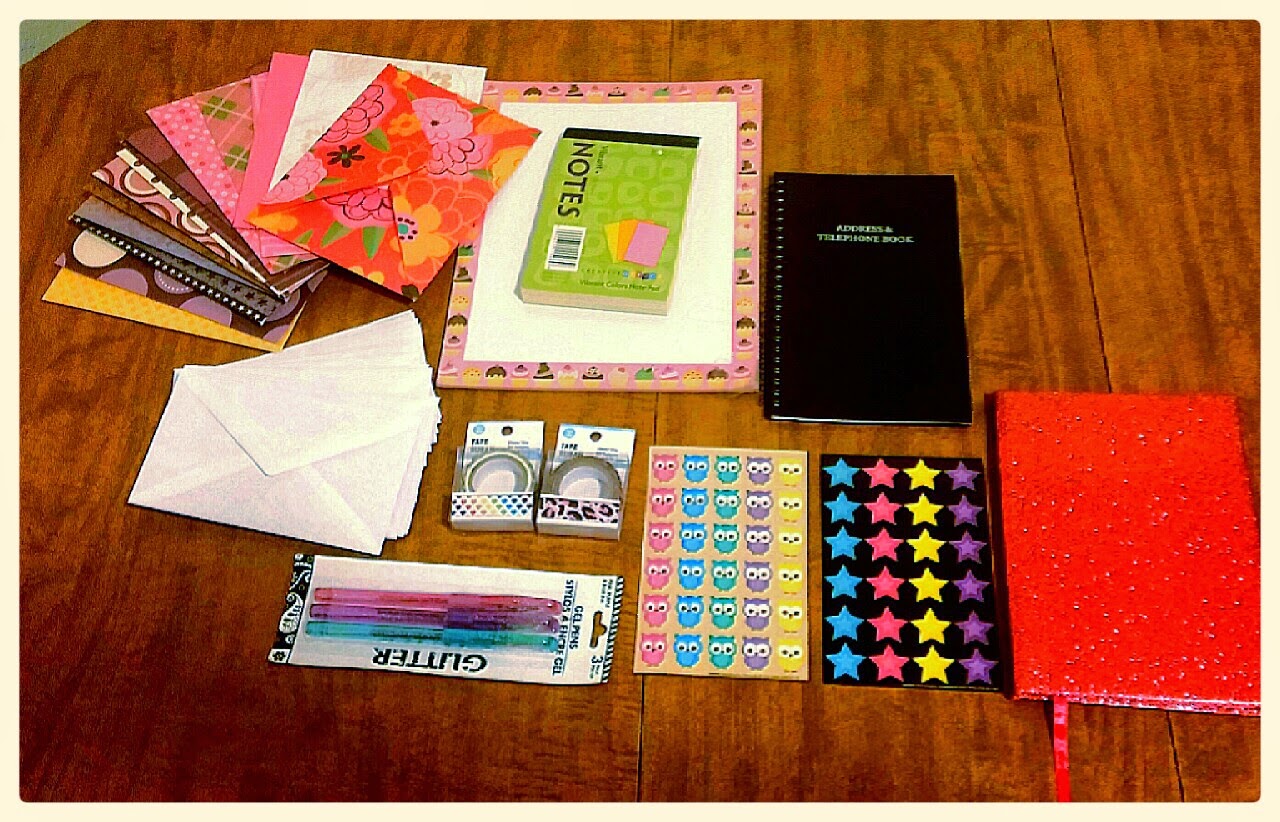
 With all these random little pieces, I knew Lara would need a way to keep everything together in one place. I was lucky enough to find a fairly flat-shaped box so it could be easily slid under a bed or stacked up when not in use. Since I acquired the box from work and it was covered in ads for contact lenses, I decided to get crafty and dress it up a bit. Three colors of craft paint, a stencil, some glitter glue, and a couple evenings later, we're done!The paint job isn't perfect, but I think everyone will agree it looks much better than the plain box. flat
All in all the entire kit only cost me about ten bucks, because I had a lot of the supplies (the materials to decorate the box, the patterned paper to make envelopes, and the plain white envelopes) on hand. I actually started assembling it back in June and added to it little by little over time, so it was really easy on the budget! Since this was a Christmas gift I decided to wait to post it until now so that the secret wouldn't get out.
Subscribe to:
Posts (Atom)